I've been up to my neck in taxes today, so thought what better way to relax than write up my crochet blog. Well. 96 tiny granny squares later, assembling and finishing completed, the waistcoat I mentioned in
this earlier post is finished and it's certainly been a labour of love. Didn't quite get it finished for Christmas, but pretty close!
Ooh, have to say I've really been enjoying working with all this lovely colour....
And seeing how the little squares improve after a touch of blocking NEVER ceases to amaze me! (I told you I should get out more)
At times our lounge looked like a (very cosy) production line. Piles of completed and blocked squares on the tray with the next batch of 10 underway, each one sitting on top of the colour which will be the next round. Another batch pinned and sprayed and drying in front of the fire... with Lucky the cat overseeing to make sure I was doing it all properly (think he got a bit bored though).
I mentioned in my earlier post that I was very much inspired by Amanda's beautiful waistcoat in her
Amjaylou blog.I don't think I would even have attempted to make my own if I had not seen hers! I even copied Amanda's choice of yarn (the gorgeous Drops Baby Merino) but with different colours. But when I experimented with the actual granny square pattern, I found I very much liked the look of the small, tight dinky square that you get when you leave out all the chain spaces. I especially loved the look of it for a man's garment. The only issue with this is that because the squares were that bit smaller, in terms of the actual assembly of the waistcoat and the finishing details, I pretty much had to do my own thing. Also I didn't use Amanda's join-as-you-go method. I couldn't really join-them-as-I-went, as I knew the size of the squares would mean a different assembly, so I just made them all first and joined afterwards. I'll put some notes at the end of this post explaining exactly what I did, in case anyone is interested!
Oh....and that issue of the shoulder seam. Aaaargh!!! As Amanda pointed out, the front panels of Paul's waistcoat were 3 squares wide, and they seemed somehow to be joined to only 2 squares at the back. I too could not work out how this was done, though I spent a good few hours trying..... ah well. 2-square-wide front panels it is. Life's too short to worry about exact copies, that's what I say.
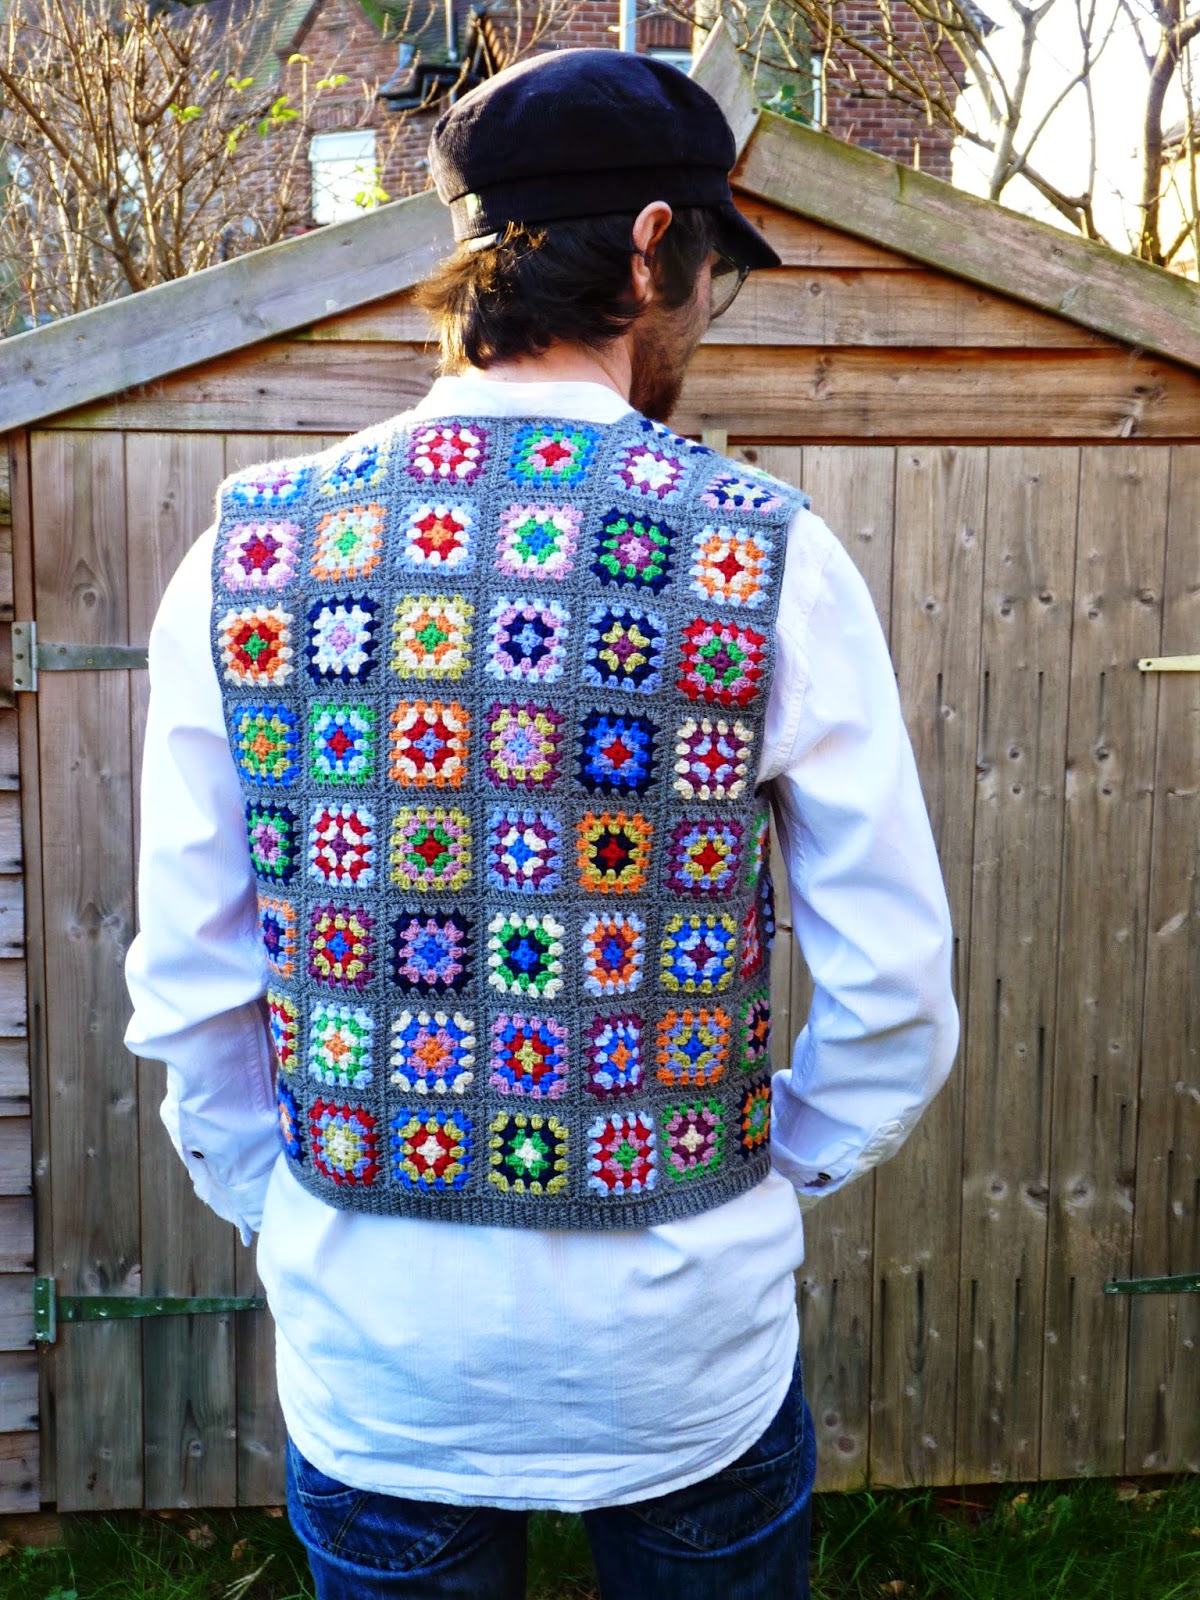
Anyway, the ta-dah moment. Here it is in all its glory, as modelled by my wonderful son Joseph. He has some style, do you agree?
And what's more, he loves it and thinks it's the coolest thing- and that's what makes it all worthwhile for me!
That cat always seems to want to get in on the action...

------------------------------------------------------------------------------------------------------------------------------------------------------------
PATTERN AND ASSEMBLY NOTES
So, here are some notes on my version of the waistcoat. The 'man's version', if you like :-)
1.
Make 96 x 5-round granny squares, using 4-ply (fingering) yarn and a 2.5mm hook. There's some info on the yarn and my colour choices in
my earlier post. Start with 4 ch joined in a ring, and NOTE: do not use any chain spaces, ANYWHERE in the coloured rounds, not even in the corners! In the final grey round of each square, put 2 ch in each corner.
2.
Join the squares thus. The back panel is 6 squares wide by 8 squares long, the 2 front panels are each 2 squares wide and 8 squares long. The side panels are each 2 wide by 4 long. This pic might help to see how it's constructed more clearly:
As already mentioned I used whipstitch (both loops) to join. Basically put 2 squares together with the right sides facing outwards, start at the top right hand corner, and away you go. I find the simplest way to do it is to sew long strips of squares, and then sew the strips together.
3.
Armholes: I finished these off using
Amanda's method- ie, dc (UK term) into each stitch around, with 2 x tr2tog (UK term) into each right angle where 3 squares meet.
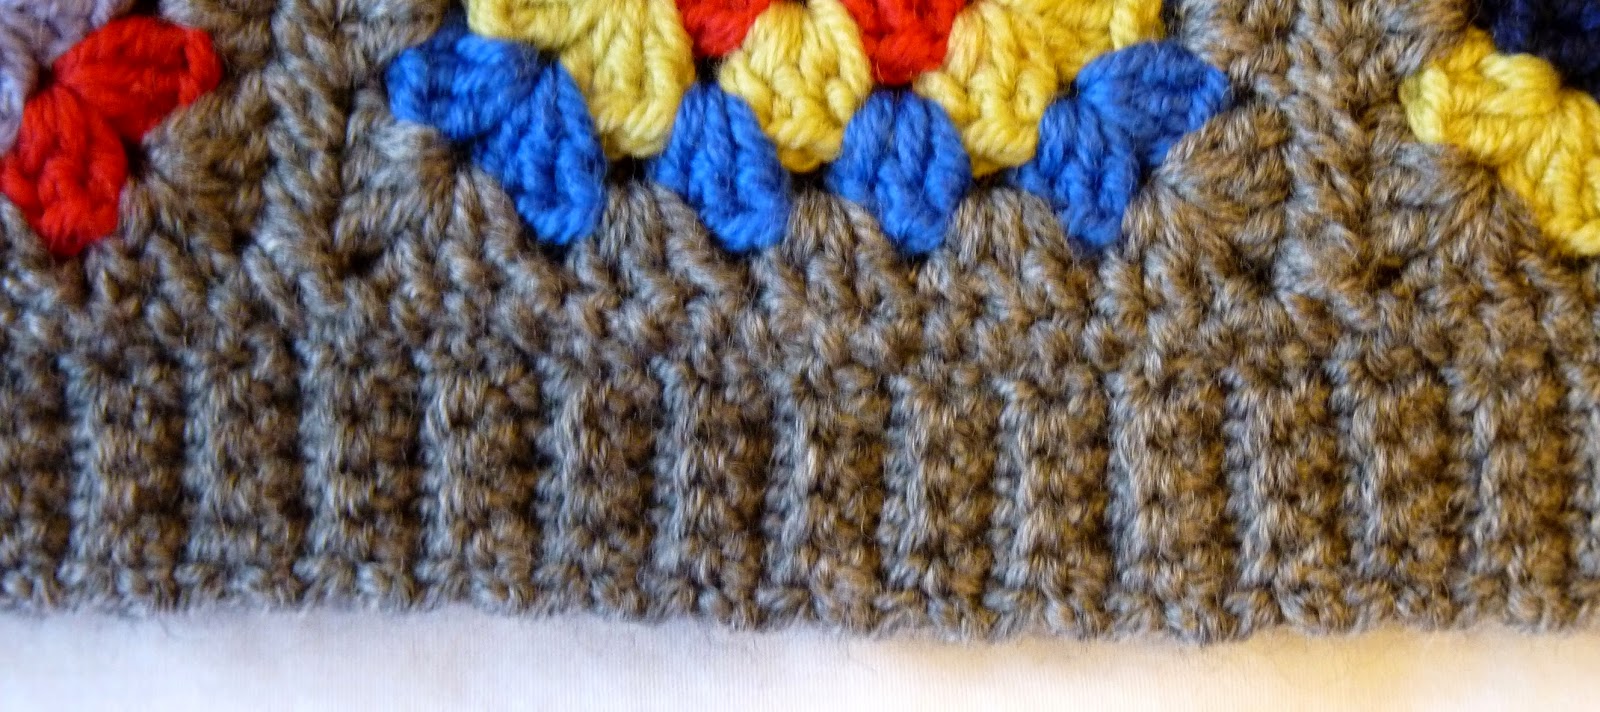
4. Ribbed border: I did mine slightly narrower than Amanda's (as the waistcoat was already an extra square long, I didn't want to add too much to the length). Also, I tried several different methods for the actual rib until I found one that worked with my waistcoat, and this is basically what I did:
-Using a hook one size larger (I used 3mm), starting at the bottom left hand side as you are looking at the waistcoat, join with a sl st into the 2 ch corner space.
-Chain for the number of stitches to get the width that you want the ribbed border to be (in my case 5), plus one extra.
-dc (UK term) into the 2nd ch from hook and into the remaining 4 ch.
-When you reach the square, sl st into the NEXT 2 trs along. Turn. DO NOT CH 1.
-dc along the row of 5 dcs that you just made, but in the middle 3 stitches, go into the BACK LOOP only. Going into the back loop is what creates the ridged effect. (If you like you can go into the back loop of ALL the stitches, but I found it gave a neater edge to do the first and last stitches as normal, and also makes them easier to 'find' when you're beginning and ending a row!)
-ch 1 (does not count as stitch), turn, and dc into each of the 5 dcs from the previous row, going into the back loop of the middle 3, as before.
-Simply repeat the last 3 steps until you get round to the other side! Here's my edge in more detail...
5. Front edging and button holes: Because my squares are smaller, I had to make this bit slightly wider so the waistcoat would button up properly.
Row 1: Return to your 2.5mm hook. Starting at the bottom of the left hand side (as you are looking at the waistcoat), make a standing tr (UK term) into the first dc of the border and then into each of the remaining 4 dcs. Tr into the corner ch 2 of the square, and into each tr and corner space around. You can add an extra tr 2tog at each point where a square joins another square (as I did) if you find it's pulling a bit and not sitting properly. Tie off and cut yarn.
Row 2 (a): Make a standing tr at the same place as before (bottom of left hand side as you're looking at it)- into your last standing tr. This side is where your buttons will be (seeing as it's a man's garment!). Tr all the way up until you get past where the 3rd and 4th squares join, then tr into the first tr of the first cluster of 3 trs. Then make 2 htrs, 2dcs and a sl st. Finish off.
Row 2 (b): Right hand side- this is where your button holes will be. Join with a sl st into the corresponding stitch opposite the sl st you just did. Make 2 dcs, 2 htrs and 1 tr. Now for your button hole: ch 3, skip 3 stitches, then tr all the way down making buttonholes in a similar way where each square joins another square. There are 4 buttons on my version. Fasten off. Another close-up might help!
Sew the buttons on, and you're done! Hurrah!!