


Oh....and that issue of the shoulder seam. Aaaargh!!! As Amanda pointed out, the front panels of Paul's waistcoat were 3 squares wide, and they seemed somehow to be joined to only 2 squares at the back. I too could not work out how this was done, though I spent a good few hours trying..... ah well. 2-square-wide front panels it is. Life's too short to worry about exact copies, that's what I say.
Anyway, the ta-dah moment. Here it is in all its glory, as modelled by my wonderful son Joseph. He has some style, do you agree?

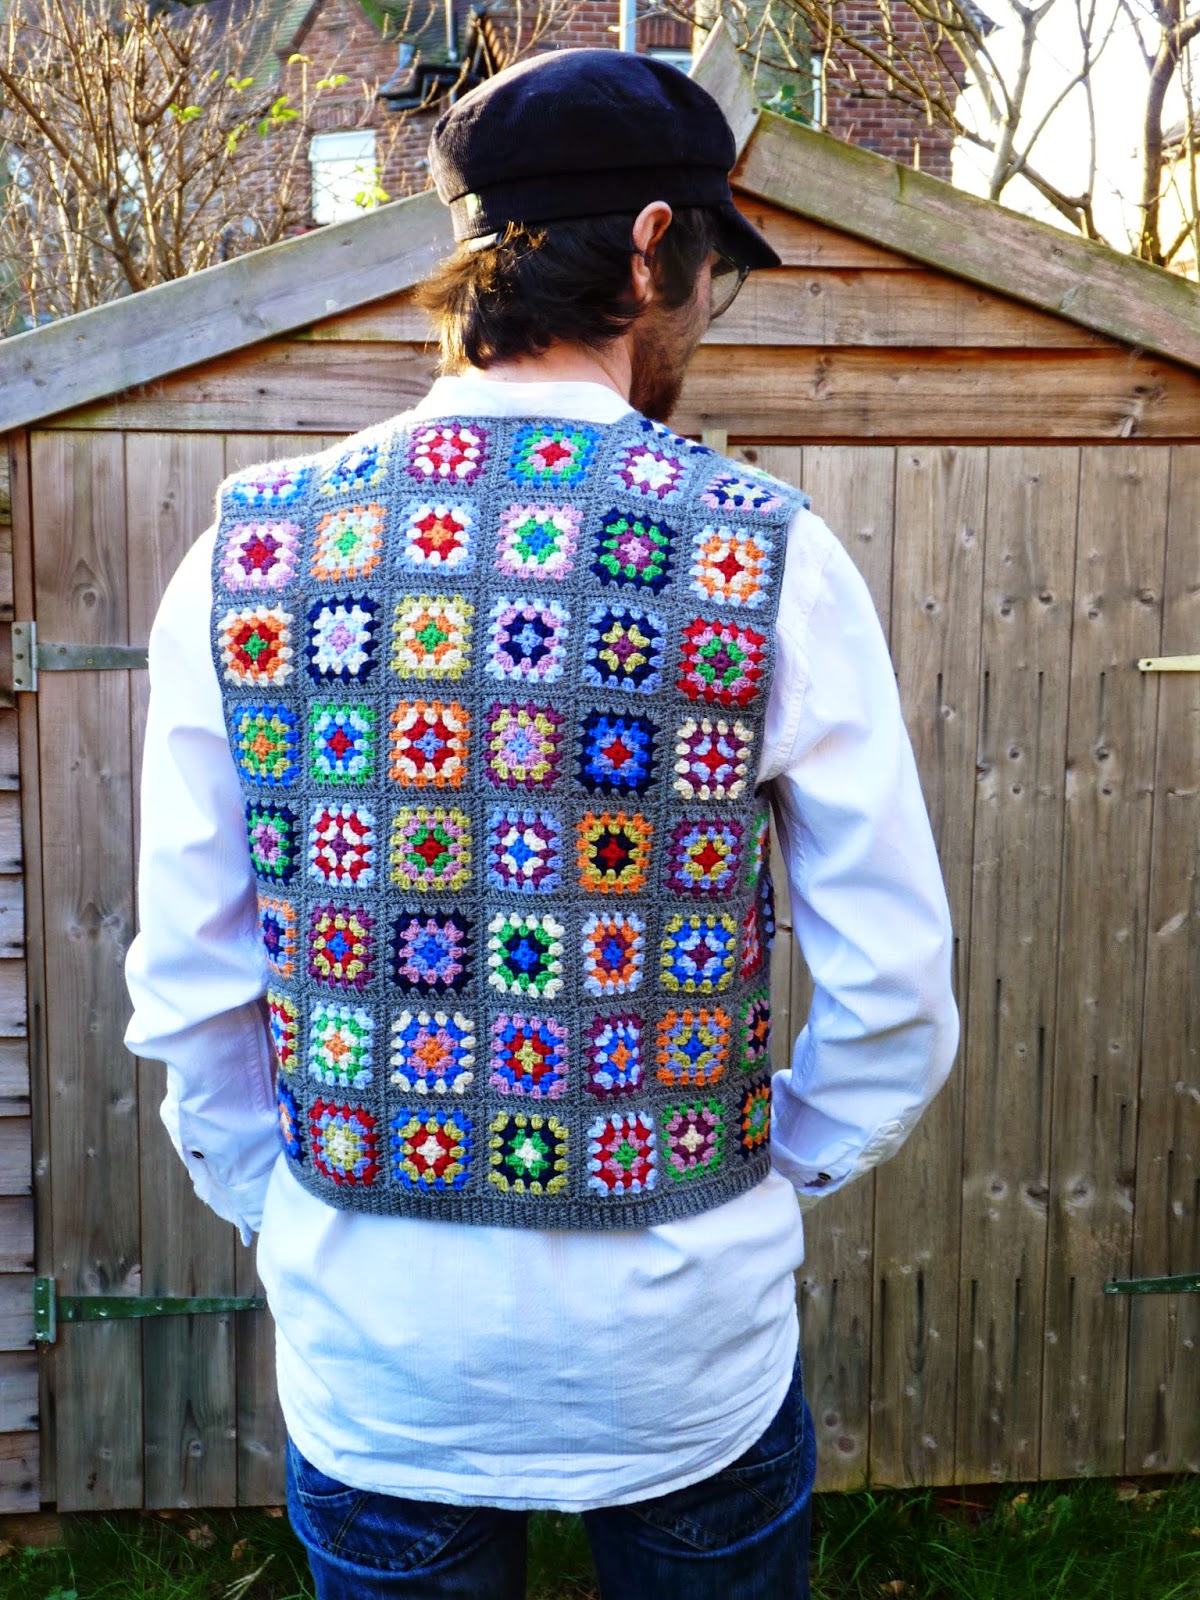
That cat always seems to want to get in on the action...

------------------------------------------------------------------------------------------------------------------------------------------------------------PATTERN AND ASSEMBLY NOTES
So, here are some notes on my version of the waistcoat. The 'man's version', if you like :-)
1. Make 96 x 5-round granny squares, using 4-ply (fingering) yarn and a 2.5mm hook. There's some info on the yarn and my colour choices in my earlier post. Start with 4 ch joined in a ring, and NOTE: do not use any chain spaces, ANYWHERE in the coloured rounds, not even in the corners! In the final grey round of each square, put 2 ch in each corner.
2. Join the squares thus. The back panel is 6 squares wide by 8 squares long, the 2 front panels are each 2 squares wide and 8 squares long. The side panels are each 2 wide by 4 long. This pic might help to see how it's constructed more clearly:


As already mentioned I used whipstitch (both loops) to join. Basically put 2 squares together with the right sides facing outwards, start at the top right hand corner, and away you go. I find the simplest way to do it is to sew long strips of squares, and then sew the strips together.
3. Armholes: I finished these off using Amanda's method- ie, dc (UK term) into each stitch around, with 2 x tr2tog (UK term) into each right angle where 3 squares meet.
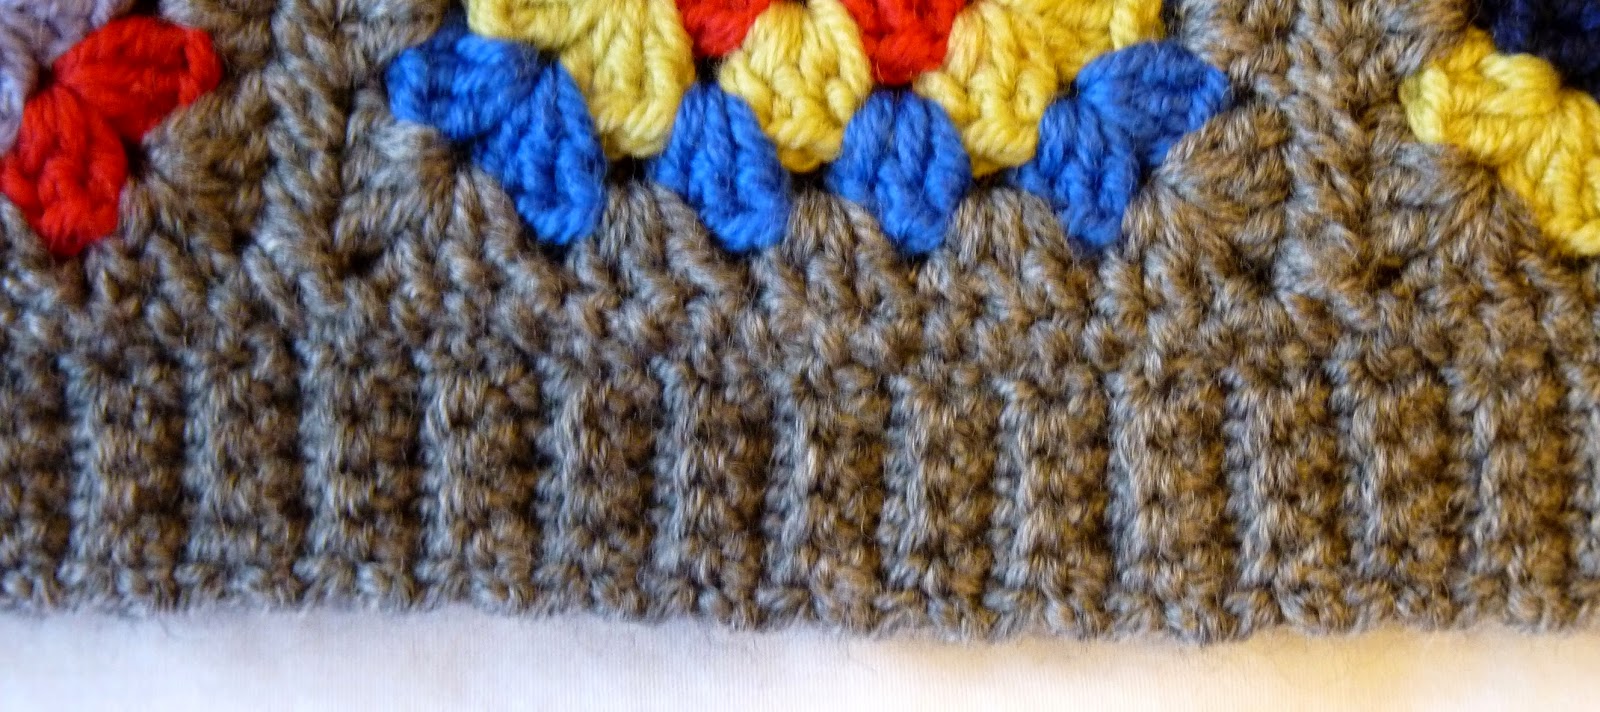
4. Ribbed border: I did mine slightly narrower than Amanda's (as the waistcoat was already an extra square long, I didn't want to add too much to the length). Also, I tried several different methods for the actual rib until I found one that worked with my waistcoat, and this is basically what I did:
-Using a hook one size larger (I used 3mm), starting at the bottom left hand side as you are looking at the waistcoat, join with a sl st into the 2 ch corner space.
-Chain for the number of stitches to get the width that you want the ribbed border to be (in my case 5), plus one extra.
-dc (UK term) into the 2nd ch from hook and into the remaining 4 ch.
-When you reach the square, sl st into the NEXT 2 trs along. Turn. DO NOT CH 1.
-dc along the row of 5 dcs that you just made, but in the middle 3 stitches, go into the BACK LOOP only. Going into the back loop is what creates the ridged effect. (If you like you can go into the back loop of ALL the stitches, but I found it gave a neater edge to do the first and last stitches as normal, and also makes them easier to 'find' when you're beginning and ending a row!)
-ch 1 (does not count as stitch), turn, and dc into each of the 5 dcs from the previous row, going into the back loop of the middle 3, as before.
-Simply repeat the last 3 steps until you get round to the other side! Here's my edge in more detail...
5. Front edging and button holes: Because my squares are smaller, I had to make this bit slightly wider so the waistcoat would button up properly.
Row 1: Return to your 2.5mm hook. Starting at the bottom of the left hand side (as you are looking at the waistcoat), make a standing tr (UK term) into the first dc of the border and then into each of the remaining 4 dcs. Tr into the corner ch 2 of the square, and into each tr and corner space around. You can add an extra tr 2tog at each point where a square joins another square (as I did) if you find it's pulling a bit and not sitting properly. Tie off and cut yarn.
Row 2 (a): Make a standing tr at the same place as before (bottom of left hand side as you're looking at it)- into your last standing tr. This side is where your buttons will be (seeing as it's a man's garment!). Tr all the way up until you get past where the 3rd and 4th squares join, then tr into the first tr of the first cluster of 3 trs. Then make 2 htrs, 2dcs and a sl st. Finish off.
Row 2 (b): Right hand side- this is where your button holes will be. Join with a sl st into the corresponding stitch opposite the sl st you just did. Make 2 dcs, 2 htrs and 1 tr. Now for your button hole: ch 3, skip 3 stitches, then tr all the way down making buttonholes in a similar way where each square joins another square. There are 4 buttons on my version. Fasten off. Another close-up might help!
Sew the buttons on, and you're done! Hurrah!!
Brilliant
ReplyDeleteThanks mum, glad you enjoyed it :-)
DeleteThe waistcoat looks brilliant on Joseph. It goes well with the white shirt and hat. Brace yourself, you'll soon be getting orders once he goes out and about in it!
ReplyDeleteAnd those front shoulder panels!!! I'm glad you found them tricksy too, I was beginning to worry my grey matter had deteriorated somewhat ;-)
I also like the way you whip stitched the squares together to get a more 'solid' looking waistcoat
It's FAB...well done you.
Amanda X
Thank you very much Amanda! I'm really glad you like it :-) xx
ReplyDeleteOh... D'oh. Talk about grey matter. Just realised I put the wrong number of squares. Mine had 96, not 86! Have edited it now :-)
ReplyDeleteMy 10-year-old daughter is doing a biography project for school on Sir Paul. My plan is to make one of these vests for her to wear because she has to dress up like him! I have about a month to make it. Enjoyed your post. Paul sure could rock the knit and crochet wear!
ReplyDeleteThanks for stopping by, Ann! That sounds like a great topic for a project, and I wish your daughter all the best with it. Would love to see the waistcoat when it's finished!
DeleteThis is amazing - I love it! I'd love one myself!
ReplyDeleteThank you so much and thank you for visiting my blog! x
DeleteThis comment has been removed by the author.
ReplyDeleteThis comment has been removed by the author.
ReplyDelete~♡~Thank You, I have been looking everywhere for this pattern.~♡~How old is your son, his cute~♡~
ReplyDeleteThanks Kim, glad you like it! The photos were taken a couple of years ago. Joseph is 22 and still loves his waistcoat.
Delete